Thursday, December 23, 2010

Citrus Mulled Wine


Winter to me tastes like glasses of warm mulled wine flavored with winter spices, citrus & vanilla! I first tried mulled wine at Epcot in the Norway pavilion and I was hooked!  Warm winter Sangria!   If you love wine and sangria you will love this, and the whole house will smell like Christmas! 

Citrus Mulled Wine Recipe

Recipe Ingredients:
  • 2 bottles of Red Wine
  • 4 clementines
  • 1 grpefruit
  • 1 orange
  • 1 lemon
  • 1 lime
  • 1 apple
  • 1 cup of sugar, or to taste
  • 6 whole cloves
  • 4 cinnamon sticks
  • 3 fresh bay leaves
  • 1 whole nutmeg (grated)
  • 1 whole vanilla pod (split)
  • 2 star anise
To serve
  • lemon, lime, oranges and grapefruit  (cut into thick wedges and thin slices)
To begin: Zest with a lemon zester or cheese grater one of each citrus fruit.
In a large heavy-based saucepan heat the sugar over a medium heat, then add in the zest and squeeze in the clementine, orange, grapefruit, lemon and lime juice (over a sieve to catch any seeds). Add the cloves, cinnamon sticks, bay leaves and about 10 to 12 gratings of nutmeg.  Stir for one minute to mix everything into the sugar syrup base.
Split a vanilla pod with a knife down its length, add it and the seeds to the saucepan and add in just enough red wine to cover the sugar. Let this simmer until the sugar has completely dissolved into the small amount of red wine, and then bring to the boil while stirring. Keep on a rolling simmer for about 4 minutes, or until a thick citrus spiced syrup is produced. Make sure the syrup does not burn, turn down the heat and stir if catching.

Making The Citrus Mulled Wine - Sugar & Peel - Citrus Syrup - Mulling The Wine

When your syrup is ready turn the heat down to low and add your star anise and both bottles of wine. Gently heat the wine on a low heat, stir occasionally and after around 15 minutes turn it off.
With a sharp knife prepare the fruit slices and wedges. It looks good to have a mixture of thick wedges and thin slices served in the glasses. Leave the peel on but remove any noticeable pith and seeds.
After the wine has mulled through, sieve the wine into a jug, punch bowl or clean saucepan to serve from and add back in the cinnamon sticks and the prepared fruit wedges.
When it is still warm and delicious, ladle the Citrus Mulled Wine into glasses with one or two wedges of citrus fruit and serve. Enjoy!  Merry Christmas!

Ice Ornaments

This is a fun and quick craft to do with the kiddies and they look beautiful shimmering in the sun!


Here’s how to make Ice Ornaments:


- Use any mold or baking tins you have around the house
- Any type of flower or berries, we used cranberries
- Place your flowers or berries in the center of your mold, fill with water
- Snip 6 inches of colored yarn and fold in half.
- Place the center point of the yarn into the water, poking it to the bottom of the mold.
- Place the molds in the freezer or on your porch depending on the weather, for several hours until they are frozen solid.
- Remove from molds by warming the outside slightly with your hands, warm running water, or a warm cloth.
-Grab  the string and tie around a branch.

Christmas Truffles

Truffles as a hostess gift!  Who doesn't like chocolate!? Merry Christmas!


8 ounces good quality chocolate cut into small pieces
3/4 cup heavy cream
2 tablespoons unsalted butter
2 tablespoons alcohol :Cognac, brandy, Grand Marnier, kirsch, or rum optional
Different Coatings for Truffles:
Dutch-Processed Cocoa Powder
Confectioners Sugar (Icing or Powdered)
Toasted and Chopped Nuts (pecans, walnuts, almonds, hazelnuts)
Toasted Coconut
Shaved Chocolate


For Truffles:  Place the chopped chocolate in a medium sized stainless steel bowl. Set aside.  Heat the cream and butter in a small saucepan over medium heat. Bring to a boil.  Immediately pour the boiling cream over the chocolate and allow to stand for 5 minutes. Stir with a whisk until smooth.  If desired, add the liqueur. Cover and place in the refrigerator until the truffle mixture is firm (this will take several hours or overnight).
Place your coatings for the truffles on a plate. Remove the truffle mixture from the refrigerator. With your hands, or else a melon baller or small spoon form the chocolate into round or mis-shaped bite-sized balls. Immediately roll the truffle in the coating and place on a parchment lined baking sheet or tray. Cover and place in the refrigerator until firm. Truffles can be refrigerated for a couple of weeks or else frozen for a couple of months. Bring to room temperature before serving.
Makes 30 small truffles.
To Toast Nuts: Preheat oven to 350 and bake nuts (pecans, walnuts or almonds) about 8 - 10 minutes or until brown and fragrant. For hazelnuts toast about 15 minutes or until the skins start to blister. Remove from oven and roll in a clean dish towel. Let the nuts 'steam' for about 5 minutes and then remove the skins. Once the nuts have cooled, chop coarsely. 

Thursday, December 2, 2010

Easy dessert idea for the Holiday Party Season

I have a lot of friends asking me for ideas on what to bring to parties this Holiday season, here is my answer:  BERRY PARFAIT!  It is an easy and beautiful addition to any party table and a welcome alternative to all the baked goods.
You can make this any way you want with any combo of berries, fruit, and whipped cream, Cool Whip or Yogurt.  For an extra kick, soak your berries in Grand Marnier overnight before assembly, or to make it a trifle add some layers of pound cake! This is one dessert you can not screw up!


Wednesday, November 17, 2010

Marcus Samuelsson’s Gnocchi

Marcus Samuelsson just seems like he is a sweet, cool guy.  He has an amazing life story and his food reflects how interesting he is. Chef Samuelsson was orphaned in a tuberculosis epidemic raging through his native Ethiopia when he was just three years old. After finding shelter in a Swedish field hospital, he and his young sister were adopted by a young Swedish couple. He started to learn how to cook at the age of six or seven. He studied at the Culinary Institute in Gotenborg and at various places in Switzerland and Austria before taking an eight-month internship at Aquavit in New York City. He then took a position at Georges Blanc in Lyon, France, a three-star Michelin restaurant. Most recently he was the winner of Top Chef Masters!

Marcus Samuelsson’s Gnocchi
Ingredients:
1 cup sea salt

2 Idaho potatoes (1/2 pound)
2 garlic cloves unpeeled, plus 1 garlic clove thinly sliced

2 large egg yolks
2 teaspoons salt
Freshly ground nutmeg
1 cup unbleached all-purpose flour

2 tablespoons olive oil
1 garlic clove thinly sliced

3 teaspoons chopped chives
Salt and freshly ground pepper


1.    Preheat oven to 350˚F.

2. Spread the sea salt on a baking sheet. Arrange the potatoes and the unpeeled garlic on the salt and roast for 30 minutes. Remove the garlic from the pan and continue to roast the potatoes until very tender, about another 30 minutes. Remove from the oven and let cool slightly.

3. Peel the potatoes and garlic and put them through a ricer into a medium bowl. Add the egg yolks, salt, and nutmeg to taste and mix well. Add the flour and knead until a dough forms. Try not to overwork the dough. (The more the dough is worked, the more flour you will need, resulting in heavier gnocchi.) Wrap in plastic wrap and let rest for 20 minutes.


4.    On a lightly floured work surface, divide the dough in half and roll each half into ½-inch thick rope. Cut each rope into ½-inch-long pieces and press the tines of a fork into each piece to make grooves in the surface. Place the gnocchi on a parchment-lined baking sheet lightly sprinkled with flour.  (At this point, you can divide the gnocchi into servings by arranging on pieces of plastic wrap dusted with flour. Wrap each serving in plastic wrap or place in zip-locked plastic bag and freeze).
  
5.    Prepare an ice bath by filling a large bowl with water and ice cubes. Bring a large pot of salted water to a boil. Working in batches to avoid overcrowding the pot, drop the gnocchi (fresh or frozen) into the water and summer until they float to the top, about 3 minutes. Remove with a slotted spoon and lace in the ice bath for 30 seconds.

6.    To reheat the gnocchi, heat the olive oil in a large sauté pan over high heat. Add the gnocchi and the sliced garlic and sauté for about 1 minute. Season with salt and pepper. Toss with chives and serve.


* I tossed it with some cherry tomatos and fennel


Delicious, and kid friendly too!


Saturday, November 13, 2010

My Rock Star Chef List

I am on vacation this week so as you can see I am making simple things whenever I can.  Once I am back home in my kitchen I will dig in to the more elaborate.
The following list of my favorites and their web links is what I am going to work my way through over the next couple weeks.  I understand that a few of your favorites may be missing so send me a note with your chef and recipe (take it easy on me) and I will try and do it. Once I master my Rock Star Chefs recipes I will try out some Master Pastry Chefs!

Alex Guarnaschelli
Art Smith
Bobby Flay 
Charlie Palmer
Charlie Trotter
Daniel Boulud
David Burke
Emeril Lagasse
Gordon Ramsay
Graham Elliot
Jamie Oliver
Jean-Georges Vongerichten
Curtis Stone
Rick Bayless
Lidia Bastianich
Marcus Samuelsson
Mark McEwan
Mario Batali
Susan Feniger
Thomas Keller
Todd English
Tom Colicchio
Wolfgang Puck

* My Celebrity chef recipes will continue with amazing recipes from Curtis Stone, Wofgang Puck, Tom Colicchio and the rest of my list in January 2011

Chef Keller, let me count the ways!


When it comes to my next Rock Star Chef, Hubert Keller, I do not even know where to begin!  Simply put I LOVE his food and flare! He is a culinary genius and if I had to choose one chef to take with me on a deserted island it would probably be him, well him AND Curtis Stone, but that is for other reasons:)
Chef Keller hails from one of the most beautiful places in the world, Alsace, France ,and it shines through all his dishes. I enjoy watching him as a judge on Top Chef Just Desserts and he was fantastic on Top Chef Masters.
I first had the pleasure of tasting his fantastic fare at a business dinner at Fleur de Lyss in Las Vegas. Every single person at the table of 12 devoured everything on their plates and I ended up going back the next night for an equally amazing dining experience.  
Imagine my delight when I found out he had just opened a BURGER BAR.  He had me at the "Burger" part:) Ever since that heavenly night when I savored my Kobe beef burger, no burger has even came close. Every Vegas trip HAS to include a stop at the Burger Bar.  I try a new creation every time and all of them are heaven!  Next time you are in Vegas you HAVE to give it a try.   
Before you make another burger at home you MUST watch THIS clip.  


Perfect French Fries
by Hubert Keller and Penelope Wisner
from Burger Bar: Build Your Own Ultimate Burger
(Wiley, 2009)
Serves 4 to 6
Perfection takes time. Three days, in fact. The long soaking leaches starch from the potatoes so they turn golden and crispy on the outside and white and fluffy on the inside.
Build your own: Depending on how you choose to cut your potatoes, you can make fat or skinny fries, wedges or shoestrings. Skins on or off, your choice. I like to serve fries in small earthenware flowerpots. You could also fashion a cone of parchment paper and fit it inside a narrow glass as a holder, then fill the cone with fries.—Hubert Keller and Penelope Wisner

 Ingredients
4 large (about 2 pounds) potatoes, preferably russets, peeled, if desired
6 to 8 cups vegetable or sunflower oil for deep frying
Coarse sea salt
Burger Bar by Hubert Keller and Penelope Wisner
Want it? Click it.
Directions
1. Place the potatoes in a pan of cold water to cover, then let them soak overnight, refrigerated. The next day, drain and cut them. For skinny fries, cut the potatoes lengthwise into 1/4-inch-thick slices. Cut these lengthwise into 1/4-inch-thick strips. For fat fries, simply increase the width of your slices. For wedges, cut the potatoes lengthwise in half, then cut the halves into wedges. To make evenly sized wedges, if the potatoes are very fat, you may need to cut a lengthwise slice out of the middle of the potato and either discard it or cut it into fat fries. For shoestrings, use the julienne blade of a mandoline and cut the potatoes into very fine strips. However they are cut, place the potatoes in a bowl, cover with cold water, and again let them soak overnight, refrigerated.
2. When ready to fry, drain the potatoes well and pat dry with paper towels or a kitchen towel. Cover a baking sheet with several layers of paper towels. Put 2 cups of oil per potato in a deep, heavy pot or deep fryer. The oil should fill the pot at least one-third full. Heat it to 250?F. Working in batches, fry the potatoes until they are cooked through but remain almost white, about 5 minutes. Drain on the prepared baking sheet. The fries may be prepared up to this point several hours in advance. Cover and refrigerate until needed.
3. Just before serving, heat the oil to 360?F. Again working in batches, fry the potatoes until they are golden and crisp. The timing will depend on the size you have cut your potatoes, but allow about 3 minutes for skinny fries. When done, drain them briefly on paper towels and sprinkle liberally with salt. Scoop them into a bowl and serve immediately.


Buffalo Burger

I made mine without the cheese and apples but added some pesto, mustard and onion as garnish. It does not look as pretty as the creations in the book but the taste is awesome.  A few more tries with these recipes and my BBQ's next summer will be off the hook! Buffalo is suprisingly a great lean meat. The fries, as their name suggests, are perfection!

This is a simple and great-tasting cheeseburger. The meat has a deep, rich flavor and is becoming more popular as people come to understand that buffalo is healthful as well as delicious. The red wine-cooked onions add complexity and moistness to the buffalo.
Build your own: You could omit the onion (in that case, be extra careful not to overcook the burger), use them for a topping, or knead them into a beef or lamb burger. If pressed for time, use raw apple for its sweet-tart crunch or leave it out. Tapenade (page 128 of the book) would make a great addition to this burger, adding rich, pungent flavor and moisture.
  • 2 tablespoons unsalted butter
  • 1/2 medium (about 2-1/2 ounces) red onion, finely chopped
  • 1/2 cup dry red wine
  • 1 teaspoon finely chopped fresh thyme
  • 2 pounds coarsely ground buffalo, chilled
  • Freshly ground black pepper
  • 2 tablespoons olive oil
  • Sea salt
  • 1 large, unpeeled tart apple, cored and cut into 1/4-inch-thick rounds
  • About 2 tablespoons brown sugar for sprinkling
  • 4 focaccia buns
  • 4 slices (about 6 ounces) Gruyere cheese
  • 2 large handfuls watercress and/or sprouts
  • 1 large, ripe tomato, thinly sliced (optional)
In a medium sauté pan, melt 1 tablespoon of the butter over medium heat. Add the onion and stir and cook until translucent, about 5 minutes. Add the wine and thyme, bring to a boil, and cook until the pan is nearly dry, about 10 minutes. Let the onion cool to at least room temperature. The onion can be cooked a day ahead, covered, and refrigerated.
Using your hands, gently knead the meat in a large bowl together with the onion and 1-1/2 teaspoons pepper. Handling lightly to keep the texture light and juicy, divide the meat into 4 evenly sized patties about 1 inch thick. The burgers can be shaped and refrigerated, covered, for several hours or overnight.
When ready to cook, heat the olive oil in a large skillet or grill pan over medium-high heat until very hot or build a medium-hot fire in a barbecue. Generously season the meat on both sides with salt and pepper.
Cook the burgers in the skillet, turning once or twice, for 7 to 10 minutes for medium-rare. Do not press down on the patties. With a large spoon, baste the burgers several times with the fat in the pan. (You can also preheat the oven to 450 degrees F and cook the burgers on top of the stove until they are brown on both sides, and then finish them in the oven.) To grill the burgers, oil the grate, arrange the patties on it, and cover. Cook as above.
While the burgers cook, melt the remaining 1 tablespoon butter and brush the apple slices on both sides. Place them in a saute pan over medium heat or on the perimeter of the grill to cook slowly. You want them to get tender but not fall apart. After about 1 minute, turn the slices and sprinkle them lightly with brown sugar. Cook for another minute, turn, and sprinkle with sugar again. Turn, cook for another minute, and then immediately remove the slices to a plate. Cut the slices in half.
When the burgers are about half cooked, toast the buns in a toaster oven or under the broiler, about 5 inches from the heat, until lightly toasted. Or toast them on the outer perimeter of the grill rack.
For the last minute or two of cooking, drape a slice of cheese over each burger to melt. Then remove them to a warm platter, sprinkle with pepper, keep warm, and let rest for several minutes before serving.
To build the burgers, fan apple slices on the bun bottoms, and top with watercress, tomato slices, if using, burgers, and then the bun tops. Serve immediately.


Friday, November 12, 2010

Massimo Capra Ham & Cheese Panini


I continue my Rock Star Chef week with a suggestion from a friend, Canadian celebrity Chef Massimo Capra.  You can see Massimo regularly on CityLine or dine at his restaurants Mistura one of my favorites in T.O, or Sopra which is a chic eatery that serves delectable cocktails and has a fabulous eclectic menu that will satisfy everyone's preferences.  It is a great date night spot!

I wanted to make something quick and simple for lunch without compromising on taste and boy did I find the perfect thing on Chef Massimo's site! This easy ham and cheese panini has got to be the best tasting ham and cheese I have ever had.  I even made Ella a kids version and replaced the rosemary with green apple and she gobbled it right up! 


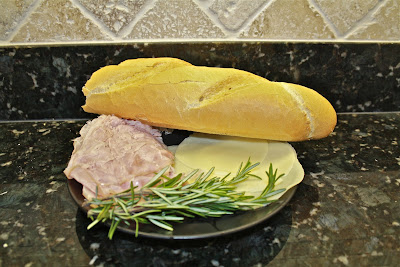
Ingredients:

  French Loaf
• 2 pieces Fontina Cheese
• 3 x Fresh Rosemary leaves
• 2 slices thin slices of Roasted Ham (you can pick up from your local deli)
Directions
Place together and sit on Panini press or pan till each side is a light golden brown. 

I added mustard to mine, because I LOVE mustard:)


Sometimes the simple things in life really are the best!


My kid version is made on whole grain bread with green apple slices instead of rosemary, mmmmm!

Thursday, November 11, 2010

Rockstar Chef Month

November is a month that we give thanks. In a time where people are becoming rich and famous for no reason at all I find myself appreciating talent so much more.  People who create amazing things are Rock Stars to me, chefs, designers, artists and authors are so much more interesting than the Kardashian's or Jersey Shore kids, and those are the people I want to celebrate. This week I want to highlight my Rock Star chefs. These chefs all have amazing restaurants, make beyond incredible food and are also fun and fabulous to watch.
My fist pick has to be my favorite, Roy Yamaguchi.

Yamaguchi specializes in Hawaiian fusion cuisine. His chain of Roy's Hawaiian fusion restaurants focuses on fresh seafood and uses a blend of fresh local ingredients combined with Asian spices and European sauces. Check Chef Roy out Here


One of my FAVORITE THINGS!

Today I am kicking off my Rock Star Chef month.  I want to start off with my ultimate favorite,  Roy Yamaguchi.  

 *Source


I have been touring  Roy's Restaurant's for years and taking part in the cooking classes they offer whenever I can. This dish is very easy, serve it with some steamed asparagus and red potatoes for the perfect meal!


Roy's Macadamia Nut Crusted Mahi Mahi
Serves 2

Ingredients:

Two 6-7 oz portions of mahi mahi
1 cup unsalted butter, softened
½ cup macadamia nuts, chopped then toasted until golden brown
¼ cup panko breadcrumbs
Salt and freshly ground pepper

Directions:

Using a wire whisk, whip butter and macadamia nuts vigorously.  Add breadcrumbs and whip for one minute, without over-mixing.  Season with salt and pepper to taste.

Season the mahi mahi with salt and pepper.  Spread macadamia nut crust over one side of the fish.  Sear the crusted side over medium heat until edges are golden brown.  Gently flip the fish over and cook to desired doneness.  Chef recommends about 2 minutes on each side.


Thai-Style Coconut Basil Sauce
2 tablespoons Olive Oil
1 tablespoon Minced fresh ginger
1 tablespoon Minced garlic
1 teaspoon Minced dried shrimp
2 teaspoon Fish sauce
1 cup chicken stock
1 cup coconut milk
1 tablespoon Palm sugar
10 Fresh basil leaves, finely shredded

 
Heat the oil in 1 quart Covered Sauce Pan over medium-high heat. Add the ginger, garlic and dried shrimp and sauté for 2 minutes. Add the fish sauce and stir to deglaze the pan. Immediately add the chicken stock, coconut milk, palm sugar and basil and bring to a simmer. Continue to simmer for 2 or 3 minutes, until the sauce is thick enough to coat the back of a spoon. Set aside and keep warm. Serve with your plated meal.

The Rainbow Cake

For my baby girls second birthday I did not want to spend hours icing a "Character Cake" so when I found this awesome Raibow Cake by Whisk Kid I had to try it out!  Turns out it is super easy and beautiful!!

There are lots of variations on this cake online and some great videos on YouTube and a step by step tutorial on the Martha site here. 
Everyone enjoyed it and the kids thought it was very cool.  This is a cake I will make again, next time mabe do a reds and pinks or blues and purples.  

This is my final kids version in the shape of a Mad Hatter hat;)

Tuesday, June 15, 2010

Blueberry Bread Pudding

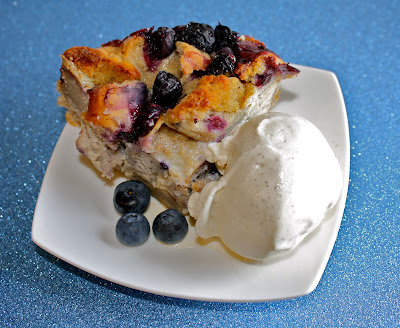
Blueberry Bagels are my baby girls favorite snack, I had a few left over that were a bit too hard so I thought I would try my classic bread pudding recipe and use these instead of Challah bread.  I had seen blueberry bread pudding done before so I thought I would try it out.  The results were even better that I could expect.  According to my husband this is one of the best desserts I have ever made!  Try it out, it is sure to be a crowd pleaser! Any kind of bagel and fruit or chocolate combo will work!


Blueberry Bagel Bread Pudding
3 blueberry bagels or any other kind you want to try
3 eggs
2 cups heavy cream (half and half or homo milk would work, too)
1/2 tsp. cinnamon
1 tsp. vanilla
3 tbsp. brown sugar
1 cup blueberries
1 tbsp. dark rum
a good pinch of salt

Dice up the bagels, mix up the other ingredients, toss it all together, let it soak overnight, bake and dive in!

Cut up the bagels into big cubes. Put those cubes in a baking dish. You can also double this recipe and put it in a wide baking dish.


In a medium bowl, whisk together the rest of the ingredients. Feel free to play around with the flavors. Big fan of cinnamon? Add more. Bigger fan of rum? By all means. Add cocoa powder or raisins or chopped pecans. That's what makes bread pudding so great; the possibilities are endless. Now pour that mixture over the bread cover with fresh blueberries and press down.


Cover with a lid or plastic wrap, push down so all the bagel bits are submerged in the custard mixture. Let that soak in the fridge for at least eight hours and ideally for a day. Now take off the plastic, cover top with fresh or frozen blueberries, and bake it at 375 degrees for 35-45 minutes. The top will be crisp and golden, and the edges will be bubbling a little. Let it sit for a bit to slightly cool and set up. Then serve it up with ice cream, whipped cream, or a shot of rum.  I know, I know, thank me later!

Saturday, June 12, 2010


My Cocktail of choice this evening!  Fresh and scrumptious Peach margaritas!  Thank You Martha Stewart!
These are Peachtastic! 

Frozen Peach Margaritas

Ingredients

  • 1 package (16 ounces) frozen sliced peaches
  • 3/4 cup tequila
  • 1/4 cup triple sec
  • 1/4 cup fresh lime juice (from 3 limes)
  • 1/4 cup sugar
  • 1 cup ice cubes

Directions

  1. In a blender, combine 1 package (16 ounces) frozen sliced peaches, 3/4 cup tequila, 1/4 cup triple sec, 1/4 cup fresh lime juice (from 3 limes), 1/4 cup sugar, and 1 cup ice cubes. Puree until smooth (stop blender and stir if necessary) and serve immediately.
From Everyday Food, May 2009

Loaded Potato Salad! MMMMM!


I love potatoes! Baked and loaded are my favorite, but basically all potato dishes rock in my book! This potato salad is no different. I have never made potato salad as, like everything else, it is easier to buy, but now I am a convert and will never eat store bought again!  Martha has quite a few potato salad options available here!

Potato Salad With Sour Cream and Scallions

Ingredients

Serves 4
  • 2 pounds white new potatoes, quartered and cut into 3/4-inch chunks
  • Coarse salt and ground pepper
  • 3/4 cup reduced-fat sour cream
  • 1/4 cup light mayonnaise
  • 1/2 cup thinly sliced scallions, plus more for garnish (optional)
  • 4 slices bacon, cooked and crumbled, for garnish (optional)

Directions

  1. In a large pot, cover potatoes with salted water. Bring to a boil; reduce heat. Simmer until potatoes are tender when pierced with the tip of a sharp paring knife, 12 to 15 minutes. Drain well.
  2. Meanwhile, in a large bowl, whisk together sour cream and mayonnaise; add warm potatoes, and gently fold to combine. Season with salt and pepper. Cover; refrigerate at least 1 hour and up to 1 day.
  3. To serve, season salad again with salt and pepper, if needed; fold in scallions. Garnish with bacon and more scallions, if desired.
From Everyday Food, July/August 2005


Monday, June 7, 2010

Magical Stuffed mushrooms


Well from time to time I will post my own non-Martha recipes and today is one of those days!  I used to have an Italian boyfriend who's mother made the most amazing stuffed mushroom caps.  She never wanted help in the kitchen, I am the same, but I would always find a reason to hover around while she made these to figure out her recipe.  This may not be the exact recipe but over the years I have added things and made it my own and these babies are magic in your mouth!

Charlie's Magical Stuffed Mushrooms:


1 package of large white mushrooms
1 package of baby bella mushrooms, stems removed and discarded
1 cup of Italian breadcrumbs or you can use regular bread crumbs and add some Italian seasoning
1 cup of good Parmigiano-Reggiano, finely grated
1/2 cup green onions or chives diced
2-3 large garlic cloves minced
1/4 cup cream cheese
drizzle of good quality olive oil

Preheat the oven to 350*

With a damp paper towel, gently wipe the mushrooms. Remove the stems of the white mushrooms, reserving for later use. If you pop out the stems there will be a perfect hole in the center for stuffing.
Finely dice the reserved stems and baby bella mushrooms.  In a medium bowl mix together the diced mushrooms, breadcrumbs, cheese, cream cheese, garlic and oinions. Slowly add some olive oil just to bind the ingredients together, not so much that the mixture becomes oily.

Mix with your hands just till everything binds together.  Season with salt and pepper to taste.


Stuff the mushrooms, using all of the mixture. Using a teaspoon works perfect.


 Bake for 15-20 minutes and let cool before you enjoy them!

 These are sinfully good!

Tuesday, June 1, 2010

Strawberries!


Yesterday Ella and I met some friends and enjoyed an afternoon at Springridge Farm.  It will still be a couple of weeks before we can pick our own but they did have some amazing little berries available and they smell wonderful!
I can not think of Strawberries without thinking of my favorite doll, Strawberry Shortcake.  I loved the dolls the toys and how yummy the hair smelled! I love that the 80's toys all got a makeover and are making a come back, it makes me so nostalgic!  I am however surprised how different she looks from the original but she is still cute! 

This gave me an idea for today's blog.  Strawberry shortcake 2 ways!

First up is the classic Strawberry Shortcake.  This is simple and quick and yum.  I made these for dessert last night and they were perfect!

 Strawberry Shortcake

Ingredients

Serves 8
  • 1 3/4 pounds (6 cups) strawberries, rinsed, hulled, and quartered
  • 1 1/4 cups plus 2 tablespoons sugar
  • 3 cups all-purpose flour
  • 4 teaspoons baking powder
  • 3/4 teaspoon salt
  • 12 tablespoons cold (1 1/2 sticks) unsalted butter, cut into small pieces
  • 2 cups heavy cream
  • 2 large eggs
  • 1/2 teaspoon vanilla extract

Directions

  1. Preheat oven to 375 degrees. In a medium bowl, toss strawberries with 3/4 cup sugar; let sit to bring out their juices.
  2. In a food processor, pulse flour, baking powder, 1/2 cup sugar, and the salt until combined. Add butter, and pulse until mixture resembles coarse meal but with some pea-size bits of butter remaining, 10 to 12 times. In a medium bowl, whisk together 1/2 cup cream and the eggs; pour over flour mixture, and pulse until some large clumps begin to form, 25 to 30 times.
  3. Using a half-cup measuring cup, gently pack dough, invert, and then tap out onto a baking sheet. Repeat to form 8 biscuits. Bake until lightly golden, about 20 minutes. Transfer to a rack to cool, about 15 minutes.
  4. Beat remaining 1 1/2 cups cream and 2 tablespoons sugar with the vanilla until soft peaks form.
  5. Slice biscuits in half horizontally. Spoon strawberries and their liquid over bottom halves. Spoon whipped cream on strawberries, and replace top halves of biscuits.
From Everyday Food, May/June 2003


I have wanted to try these ever since I saw them in the magazine a few years ago but of course never got around to it...until now!

Strawberry Shortcake Cookies are easy and delicious!  They are more like a mini cake than a cookie but they are delish!

Strawberry Shortcake Cookies

Ingredients

Makes about 3 dozen
  • 12 ounces strawberries, hulled and cut into 1/4-inch dice (2 cups)
  • 1 teaspoon fresh lemon juice
  • 1/2 cup plus 1 tablespoon granulated sugar
  • 2 cups all-purpose flour
  • 2 teaspoons baking powder
  • 1/2 teaspoon coarse salt
  • 3 ounces (6 tablespoons) cold unsalted butter, cut into small pieces
  • 2/3 cup heavy cream
  • Sanding sugar, for sprinkling

Directions

  1. Preheat oven to 375 degrees. Combine strawberries, lemon juice, and 2 tablespoons granulated sugar. Whisk together flour, baking powder, salt, and remaining 7 tablespoons granulated sugar in a large bowl. Cut in the butter with a pastry cutter, or rub in with your fingers, until mixture resembles coarse crumbs. Stir in cream until dough starts to come together, then stir in strawberry mixture.
  2. Using a 1 1/2-inch ice cream scoop or a tablespoon, drop dough onto baking sheets lined with parchment, spacing evenly apart. Sprinkle with sanding sugar, and bake until golden brown, 24 to 25 minutes. Transfer to a wire rack, and let cool. Cookies are best served immediately, but can be stored in an airtight container at room temperature for up to 1 day 
 I wanted them large so I made 12 large instead of 36 small.
 They turned out fantastic!  The perfect size.
You can eat these plain....
or they make the most delicious strawberry ice cream sandwich!

Sunday, May 23, 2010

All About the Chives


I do not know about you, but I really enjoy Chives.  They give a light, fresh hint of onion to whatever they garnish, and are an integral component of seasoning mixes, as well as being an important element in any garden. I wanted to showcase these beautiful babies in a couple dishes today, but also wanted to keep with ingredients I have on hand.  Martha had this recipe for Barbara Walters' Scrambled Eggs 

 This is Whisky, my trusty egg beater.  My Dad got him for me a few years ago and I since have been on a mission to collect the whole line, they are so cute! I actually am a kitchen gadget junkie and love all of these products, check out the msc-international site and download the 2010 catalog to see all their cute and cool products and ask for them at a kitchen specialty store near you.

At first I thought, Barbara Walters is crazy skinny and I am always skeptical about recipes by super skinny people, but Babs proved me wrong, these were scrumptious!  The shredded swiss really makes a difference mixed with the chives.  This was up there on my list of perfect breakfast foods.

Barbara Walters' Scrambled Eggs 

  • 2 large eggs
  • 1 tablespoon milk
  • 1 teaspoon coarse salt
  • 1 tablespoon chopped fresh chives
  • 2 tablespoons chopped or shredded Swiss cheese
  • 1 tablespoon butter
  1. In a small bowl, combine eggs, milk, salt, chives, and cheese. Beat ingredients together with a fork and set aside.
  2. Heat butter in a small nonstick skillet until melted. Add egg mixture. Using a heatproof rubber spatula, gently pull the eggs from the side of the skillet. As the eggs start to set, stir them gently until curds form, about 2 minutes. Transfer to a plate; serve immediately.

Cheddar Chive Biscuits
 I had a bunch of cheddar cheese as well so decided to try and whip up a batch of Biscuits to have for dinner tonight. I used a recipe for cheddar and sage biscuits from  Everyday Food and I traded out the sage for chives. These turned out so light and fluffy, not the hockey pucks I was expecting for my first try at biscuits!  Let's hope they stay that way till dinner time!


  • 4 cups all-purpose flour (spooned and leveled), plus more for working
  • 2 tablespoons baking powder
  • 1 teaspoon baking soda
  • 2 teaspoons coarse salt
  • 2 cups grated sharp white cheddar (5 1/2 ounces)
  • 2 tablespoons chopped fresh chives
  • 3/4 cup (1 1/2 sticks) cold unsalted butter, cut into pieces
  • 1 1/2 cups low-fat buttermilk

Directions

  1. Preheat oven to 450 degrees. In a food processor, pulse flour, baking powder, baking soda, and salt. Add cheddar and chives and pulse to combine. Add butter and pulse until mixture is the texture of coarse meal, with a few pea-size pieces butter remaining. Add buttermilk and pulse just until combined, 2 to 3 times. 
  2. Turn dough out onto a lightly floured work surface and knead just until it comes together. With a floured rolling pin, roll dough to a 3/4-inch thickness. With a floured 2 3/4-inch round biscuit cutter, cut out 12 biscuits (reroll and cut scraps).
  3. Place biscuits on a baking sheet, 1 1/2 inches apart, and bake until puffed and golden, 12 to 15 minutes. Transfer to a wire rack. Serve warm or at room temperature.


Pages

 
Template by suckmylolly.com - background image by elmer.0